
Payments tab
Overview
The payments tab represents the current transactions issued by the end user. You can interact with the transactions via the Payments table (shown below). When you sign in to the Merchant Portal, you'll see the most recent transactions.
In this tab, you can also create & send a payment link, reinitiate a voided transaction, perform a refund, configure tips, and export a report.
To learn more about payment status, please view the article on Payment status.
Viewing transactions
All your transactions will appear in the table, with the latest ones at the top. There is pagination at the bottom right (< 1 >) if there are too many transactions to show on one page.
Note: to ensure you're viewing the most recent transaction data, click the refresh button, which resets all filters and updates the table.
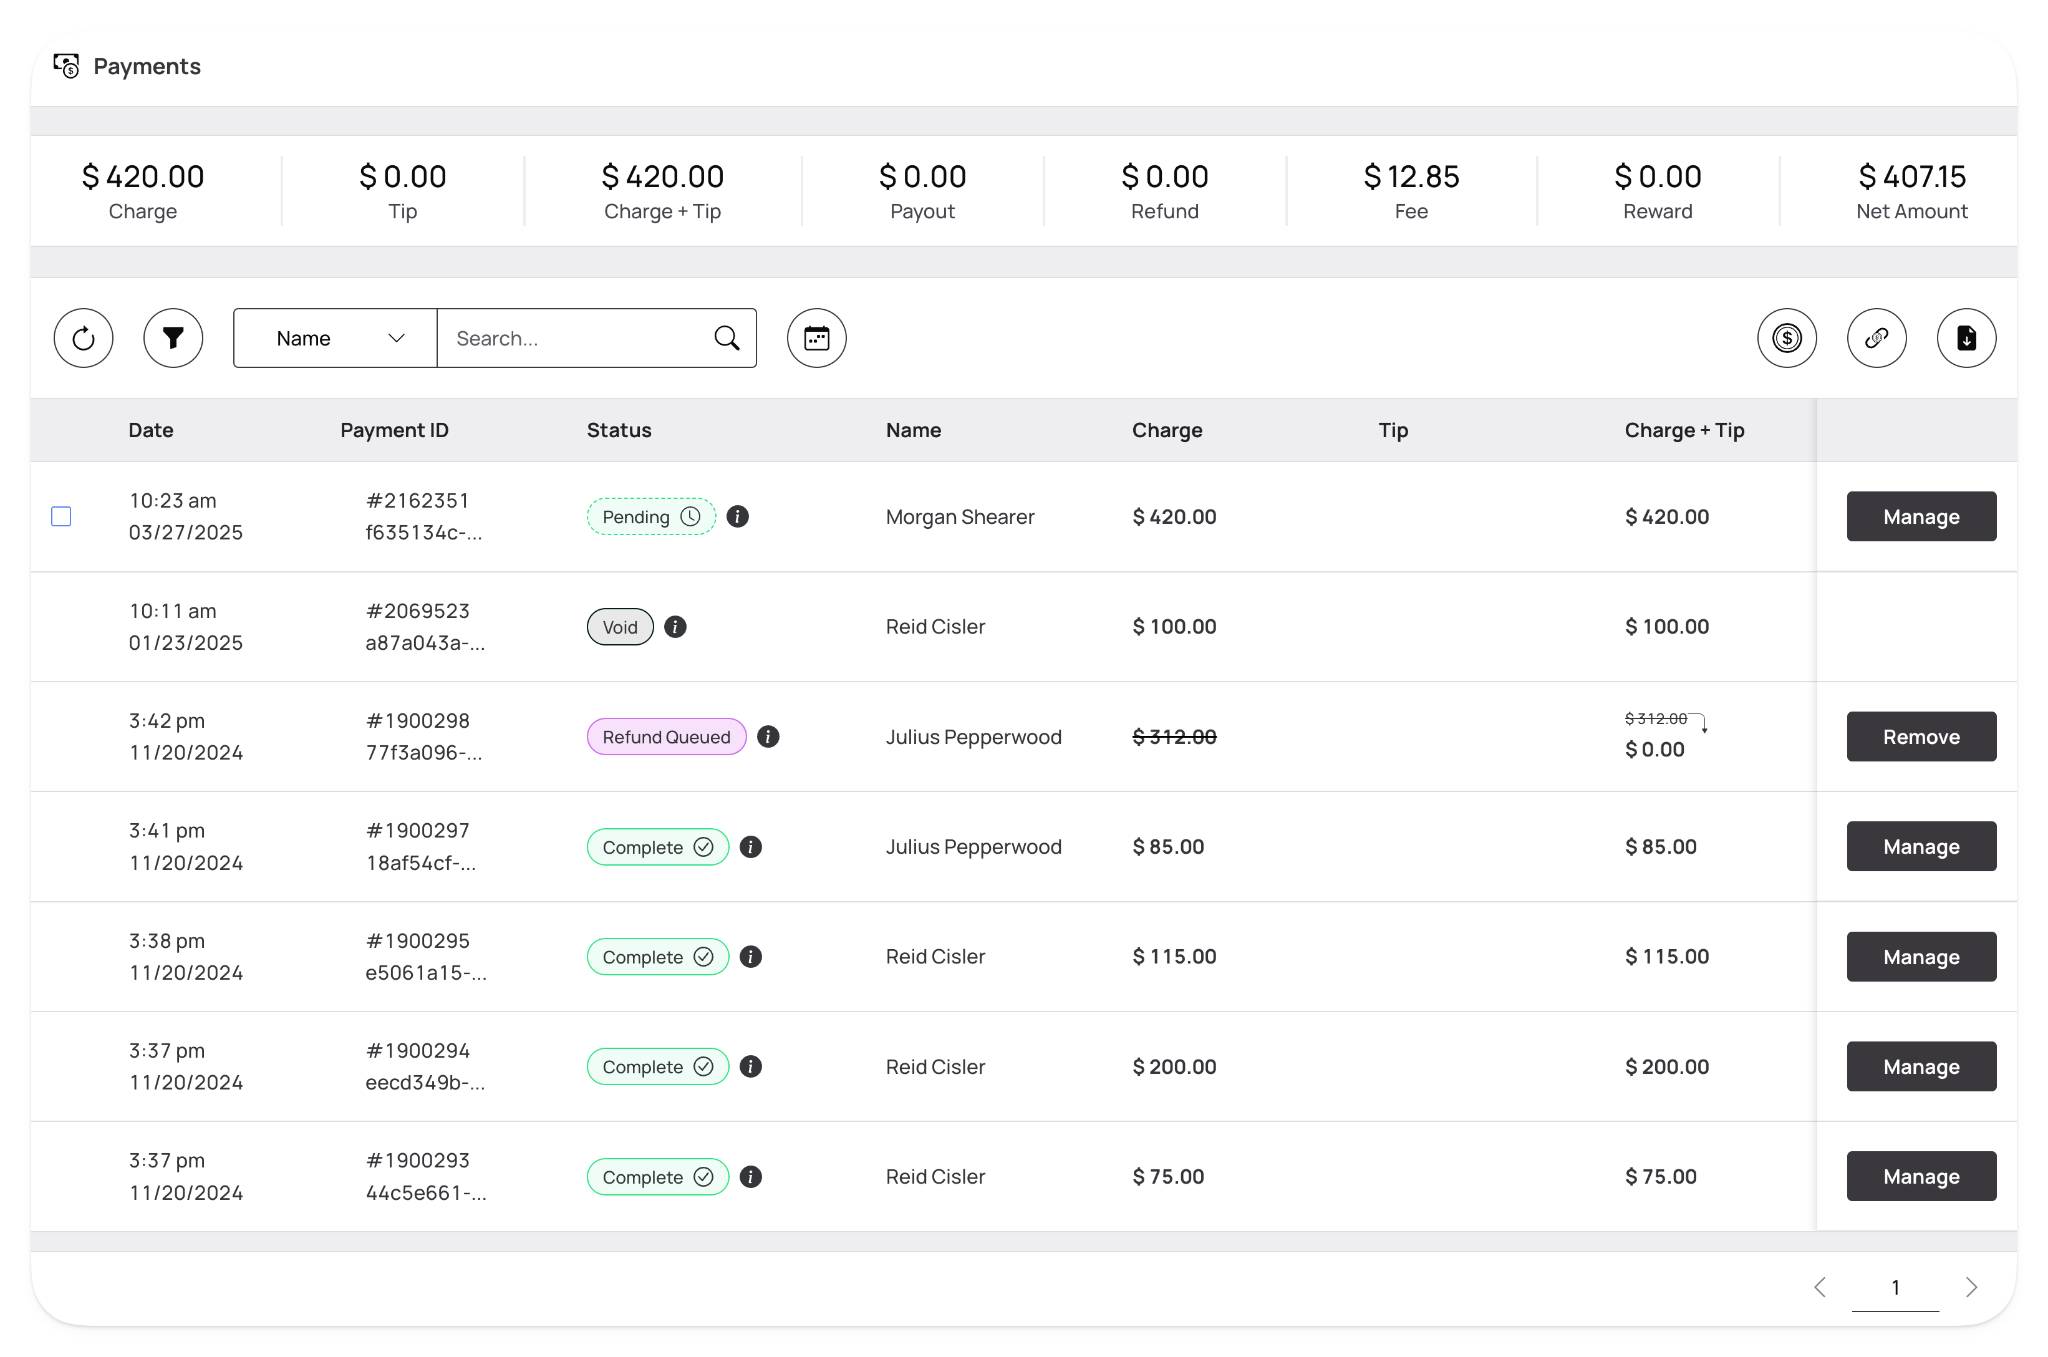
Here's what each column in the transaction table represents (grouped accordingly):
Date → the date and time the transaction was initiated
Payment ID → a unique identifier for the payment used for internal tracking
- Lightning Bolt Icon → this transaction is marked as an RTP (Real Time Payment)
Status → the current state of the transaction
- Complete → the payment has processed
- Resolved → a declined payment was successfully retried and captured
- Declined → the payment has declined (the 'i' next to the status will give more information on the type of decline, including the R code)
- Void → the payment was canceled, voided, or fully refunded before processing
Name → the name of the customer who completed the transaction
Charge → the dollar amount charged to the customer (excluding tip)
Tip → any tip amount added by the customer during checkout
Charge + Tip → the total value of the transaction, including tip
Payout → the amount paid out to the customer (if applicable)
Fee → the total fee deducted from the transaction
Reward → any cashback, incentive, or discount applied to the transaction
Net Amount → the final amount the merchant receives (Charge + Tip - Fee - Reward).
Invoice → the invoice or reference ID tied to the transaction (if applicable)
Location Info → the name of the location where the transaction occurred
Merchant ID → a unique identifier for the merchant account
User ID → the ID of the customer who completed the payment
Location ID → the internal ID of the location or store where the transaction took place
Filtering transactions by payment status & type
You can also use the filter button to view the transaction based on a specific status and type. You can apply one filter at a time to narrow your results by payment status, payment type, or reputation status.
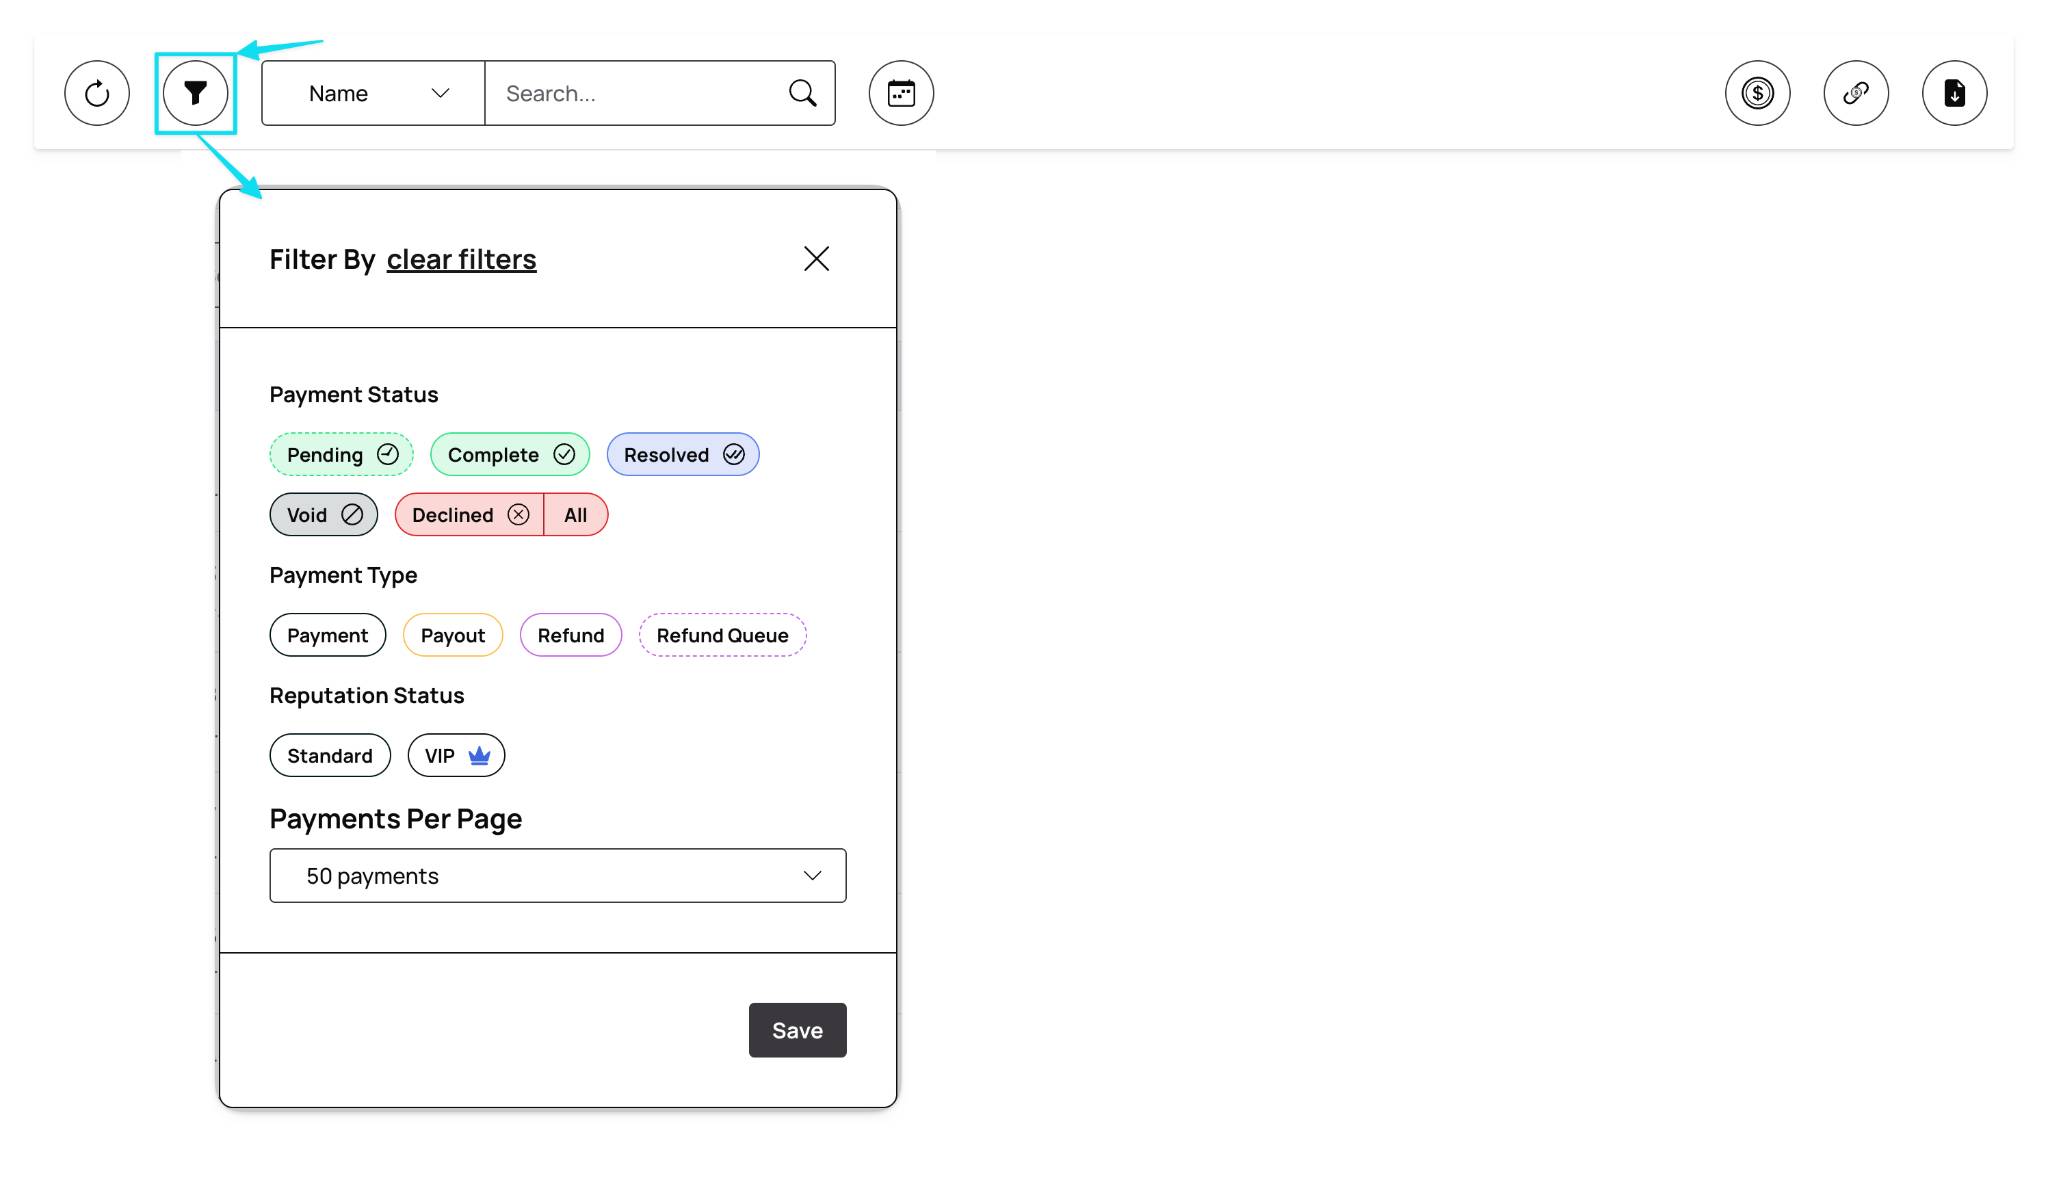
The options here are:
Payment Status → the current state of the transaction
Payment Type → the category of the transaction
Reputation Status → the trust level of the customer based on your business's criteria
Payments Per Page → the number of transactions displayed per page in the portal
For more information on payment status, please view the article on Payment Status.
Filtering transactions by date and time
Additionally, you can use the calendar button to alter the time window in which you prefer to view the transactions. Selecting a time will automatically refresh the table to reflect your time window.
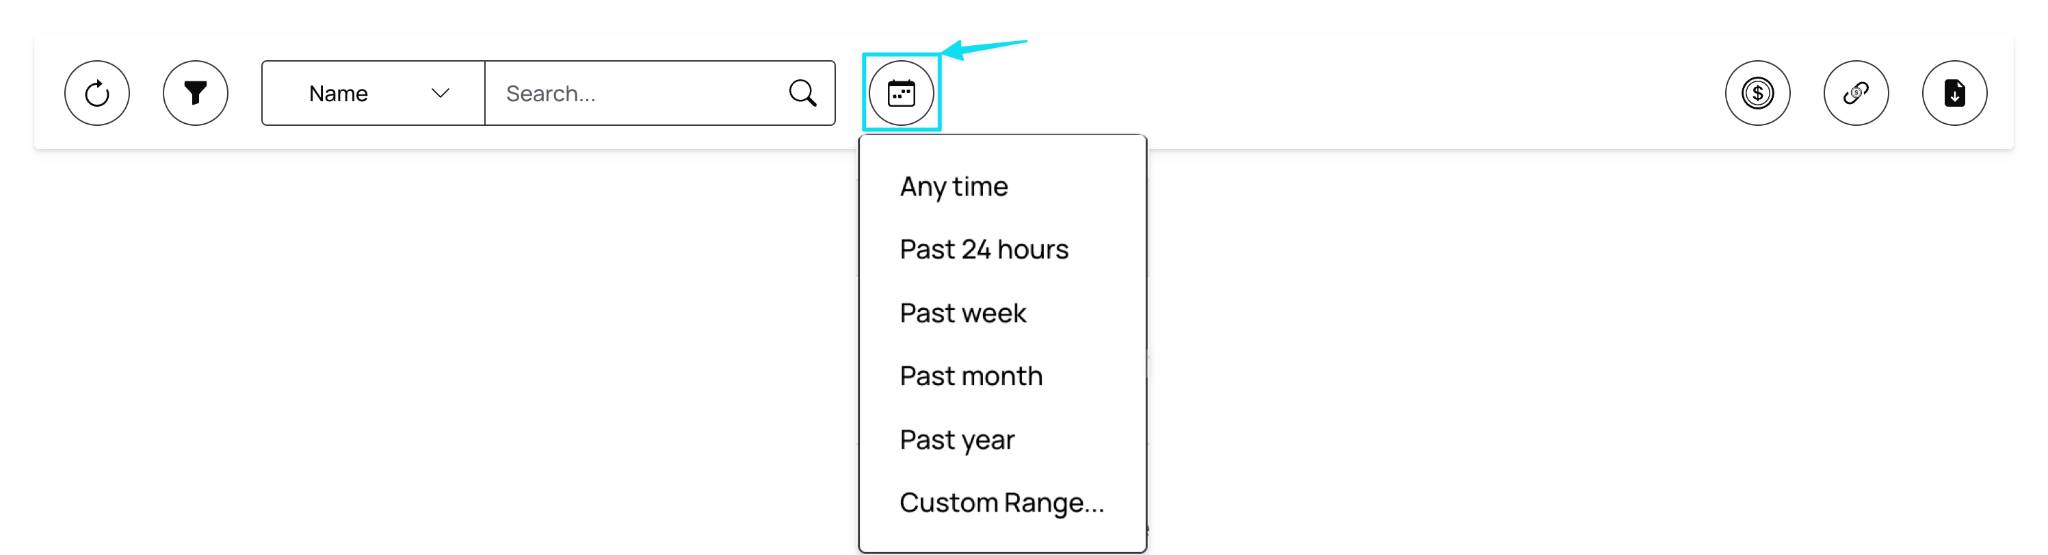
The options here are:
Anytime
Past 24 hours
Past week
Past month
Past year
Custom Range
With these options, you can view your transactions in their entirety or focus on a particular segment of time for troubleshooting or reconciliation actions.
Searching for transactions
You can use the search bar to view the transactions specific to the drop-down filter to the left. You can tailor your search to the options below by opening the drop-down filter.
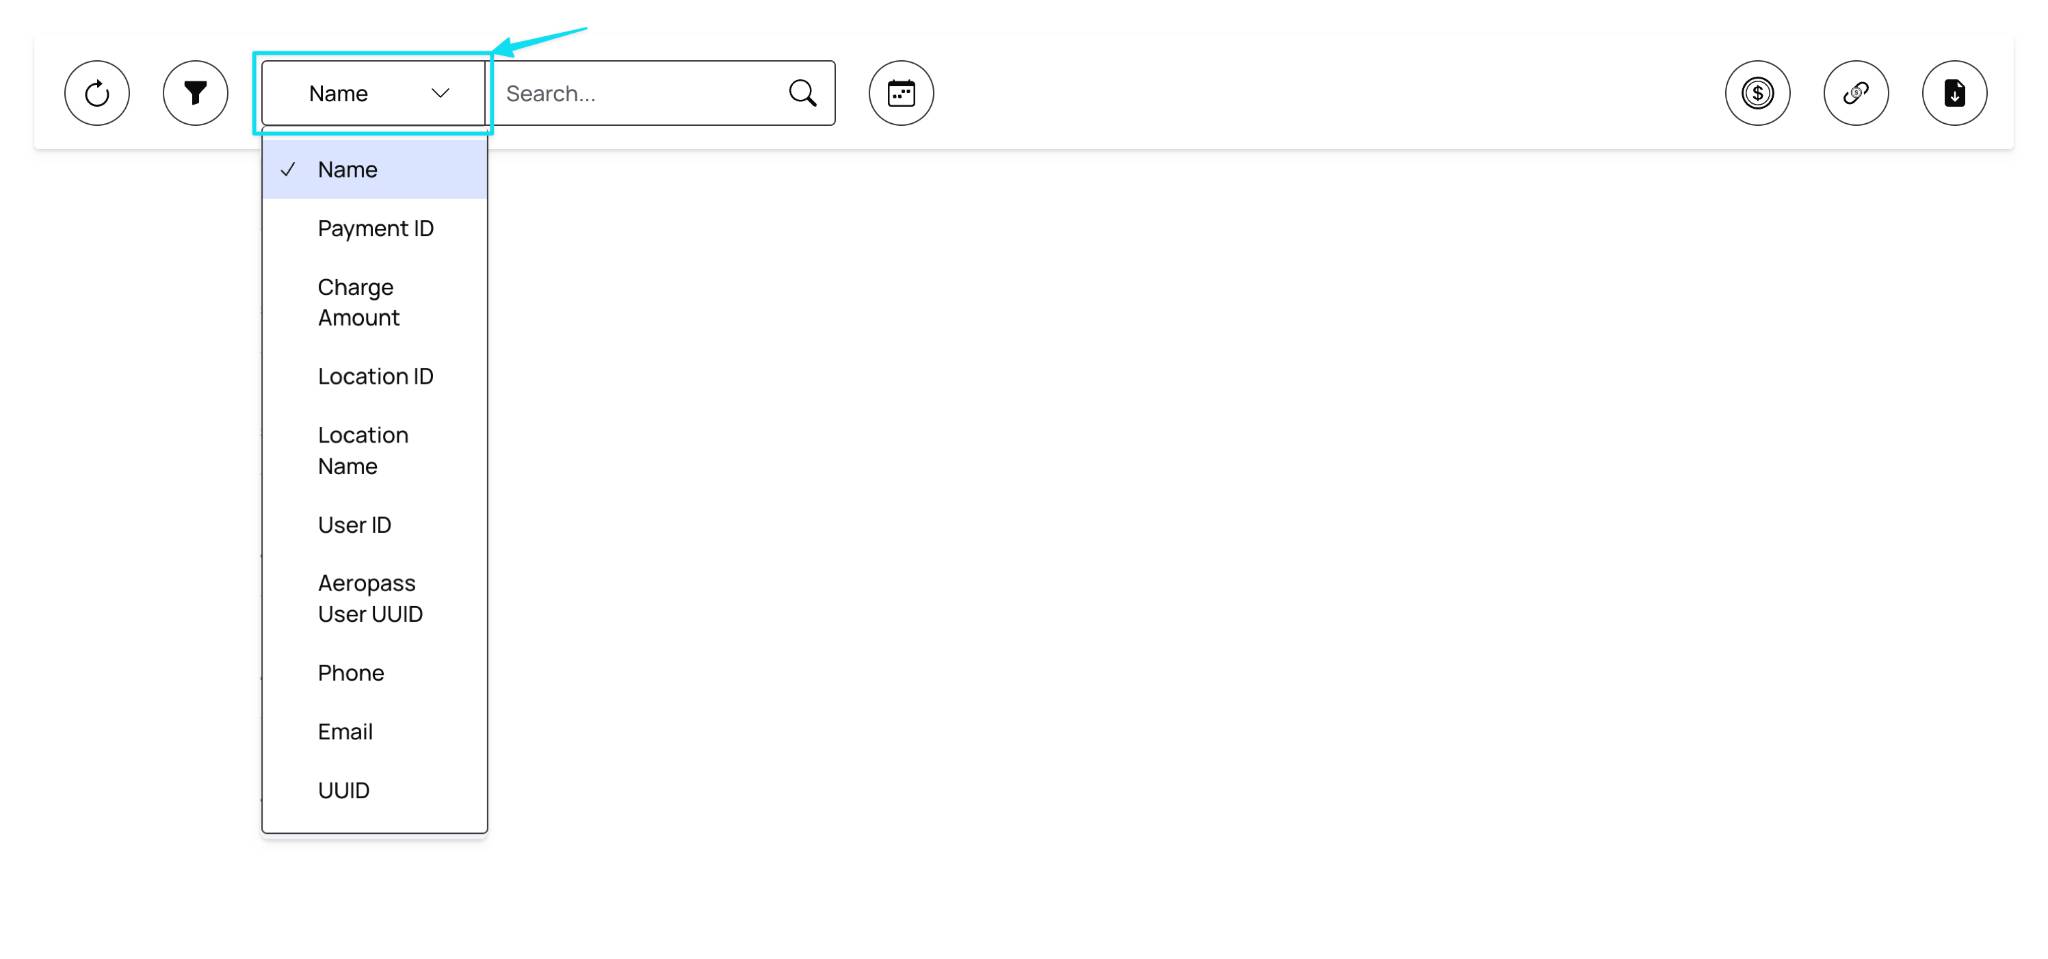
The options here are:
Name → the customer's full name associated with the transaction
Payment ID → the unique identifier assigned to a specific payment
Charge Amount → the dollar amount that was charged for the transaction
Location ID → the internal identifier for the location where the transaction occurred
Location Name → the name of the specific location where the transaction occurred
User ID → the internal ID assigned to the customer across the Aeropay network
Aeropass User UUID → a unique identifier tied to the customers' Aeropay account
Phone → the customer's phone number associated with their Aeropay account
Email → the customer's email address associated with their Aeropay account
UUID → a unique identifier used to track the transaction across services
Creating and sending payment links
From the Merchant Portal, you can create and send payment links via the Payments tab.
These payment links are incredibly flexible and can be used in different ways depending on your business and/or customer needs.
To create a payment link, click the 'link' button at the far right of the page. (shown below)
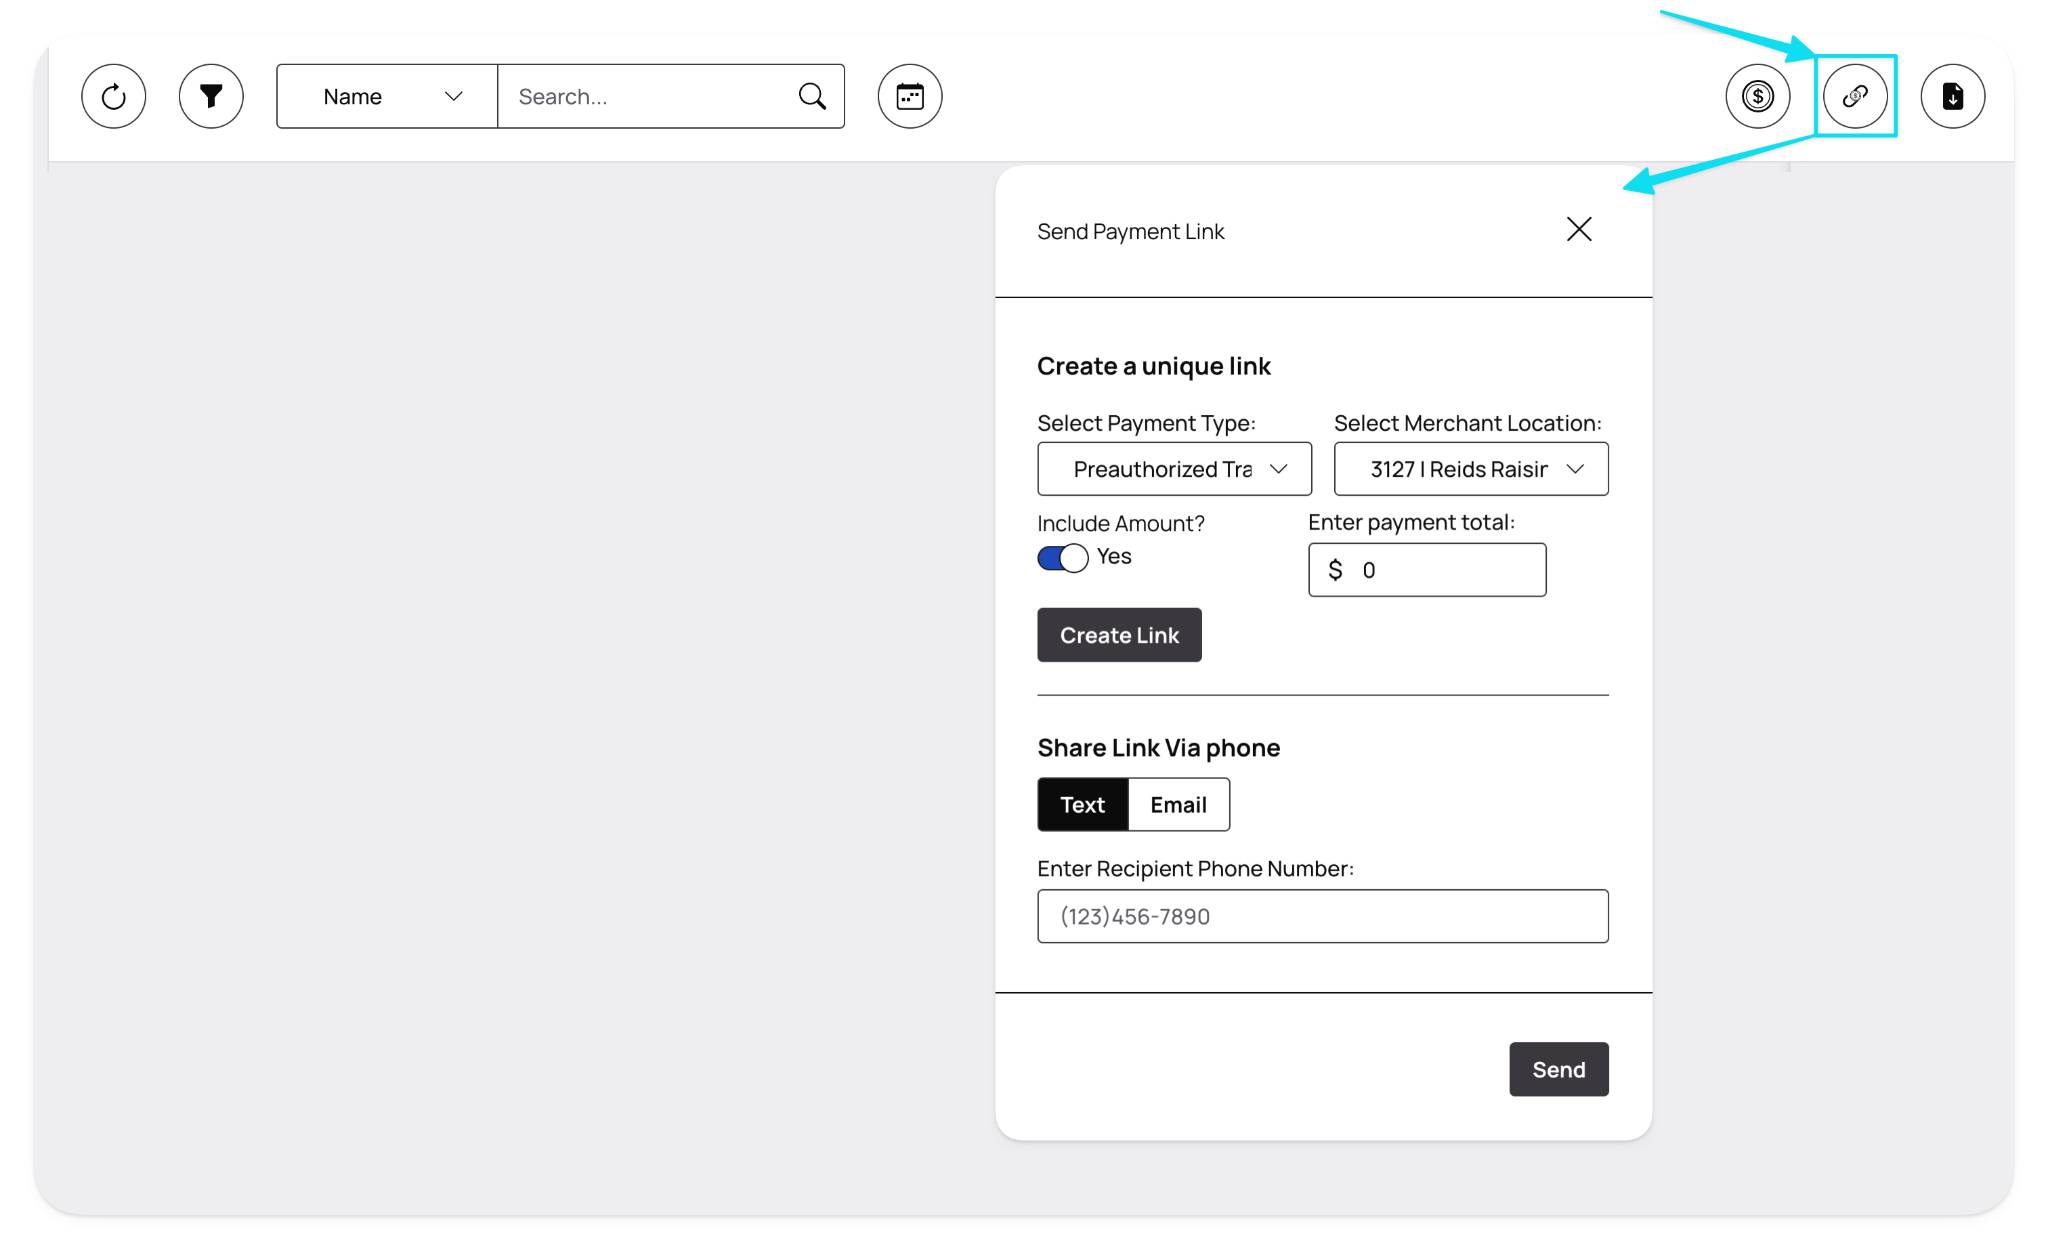
There are multiple steps when creating a payment link; these are described below:
Select Payment Type:
Selecting a payment type allows you to create a unique link based on the type of transaction you are looking to send to a customer; these options are:
- Preauthorized Transaction → A transaction in which the payment amount is authorized by the customer's bank. The transaction amount can be edited before it is captured for batching and settlement
- Standard Transaction → A transaction in which the payment amount will immediately be captured for batching and settlement
- Subscription Transaction → A recurring transaction (monthly or yearly) based on subscriptions set up inside the Merchant Portal
Select Merchant Location:
Selecting a merchant location allows you to choose a specific location to which the transaction will flow. For more information, please view the article on Merchant Locations.
Including an Amount & Entering Payment Totals:
By default, the "Include Amount" button is toggled on, showing the "Enter payment total" section next to it.
If you want to include an amount inside the payment link you are sending, use this function. Including the amount will tie the typed dollar amount to the specific payment link.
Turning off the "Include Amount" button will use a blank payment link, which can be used multiple times, as the customer will need to enter the transaction total manually.
Sharing the Payment Link:
There are multiple ways to share a payment link via the pop-up window, these are:
- "Create Link" Button → this button will create a payment link and copy it to the computer's clipboard for ease of pasting wherever needed
- Share Link via Phone → this option will text the payment link to the recipient's phone number entered in the box below - click the "Send" button at the bottom right to send
- Share Link via Email → this option will email the payment link to the recipient's email address entered in the box below - click the "Send" button at the bottom right to send
Performing a full or partial refund
From the Merchant Portal, you can manage transactions to perform full or partial refunds via the Payments tab.
To manage a transaction, click the 'manage' button at the far right of the transaction. (shown below)
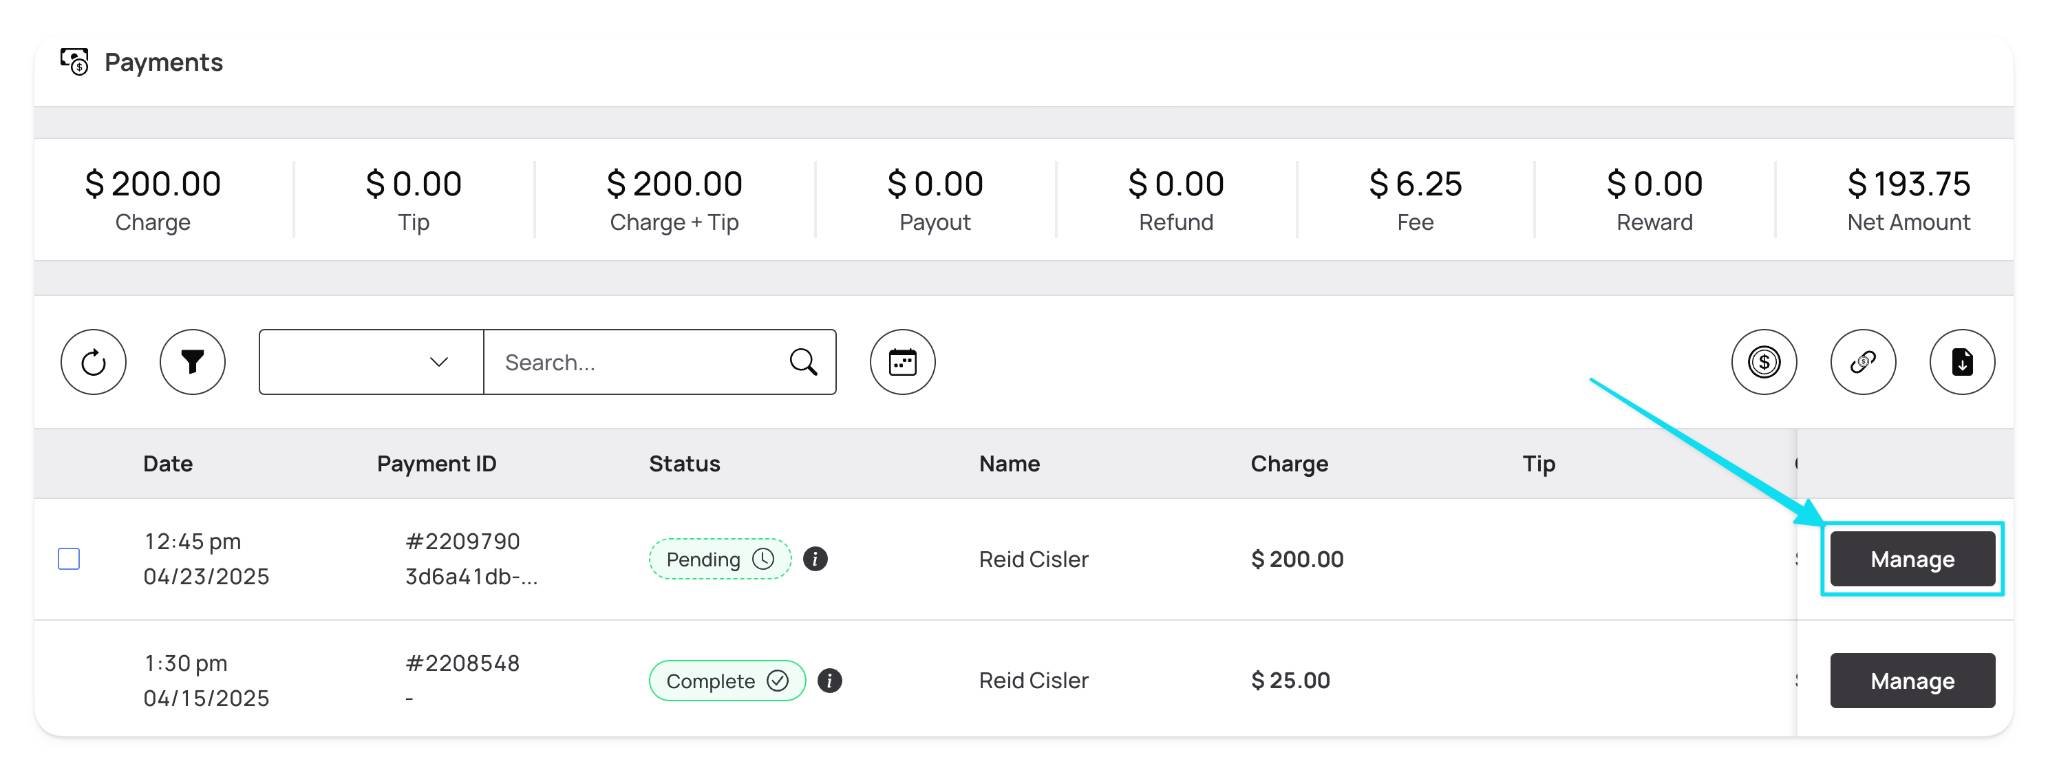
A pop-up will appear when the 'manage' button is clicked to perform a full or partial refund.

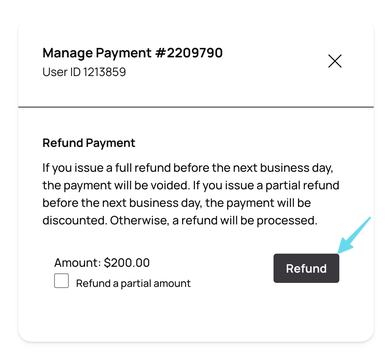
Performing a full refund
To perform a full refund, simply click the 'refund' button displayed in the pop-up.
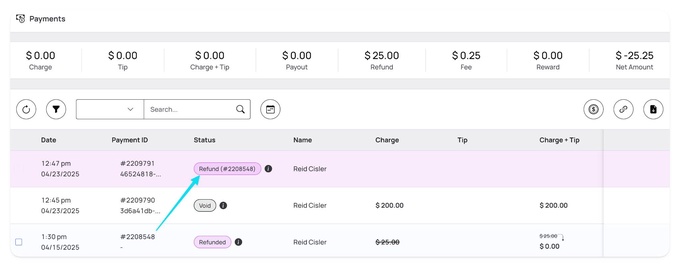
Once the refund button is clicked, a new refund transaction will be displayed in the table (highlighted in purple).
You can also see that the original transaction now displays "Refunded" as its status, and the Payment ID of the original transaction is included within parentheses in the new refund transaction (shown below).
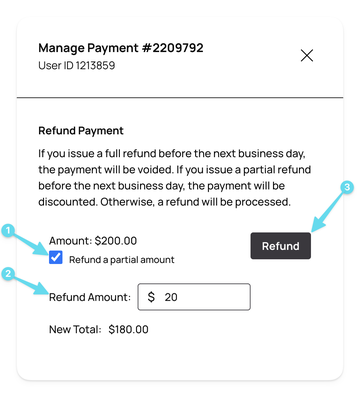
Performing a partial refund
To perform a partial refund, select the box next to "refund a partial amount." Doing so will show a new field titled "refund amount," in which you can enter the dollar amount of the partial refund. This will also showcase a new total at the bottom.
Once complete, click the "refund" to initiate the partial refund. (steps shown below)
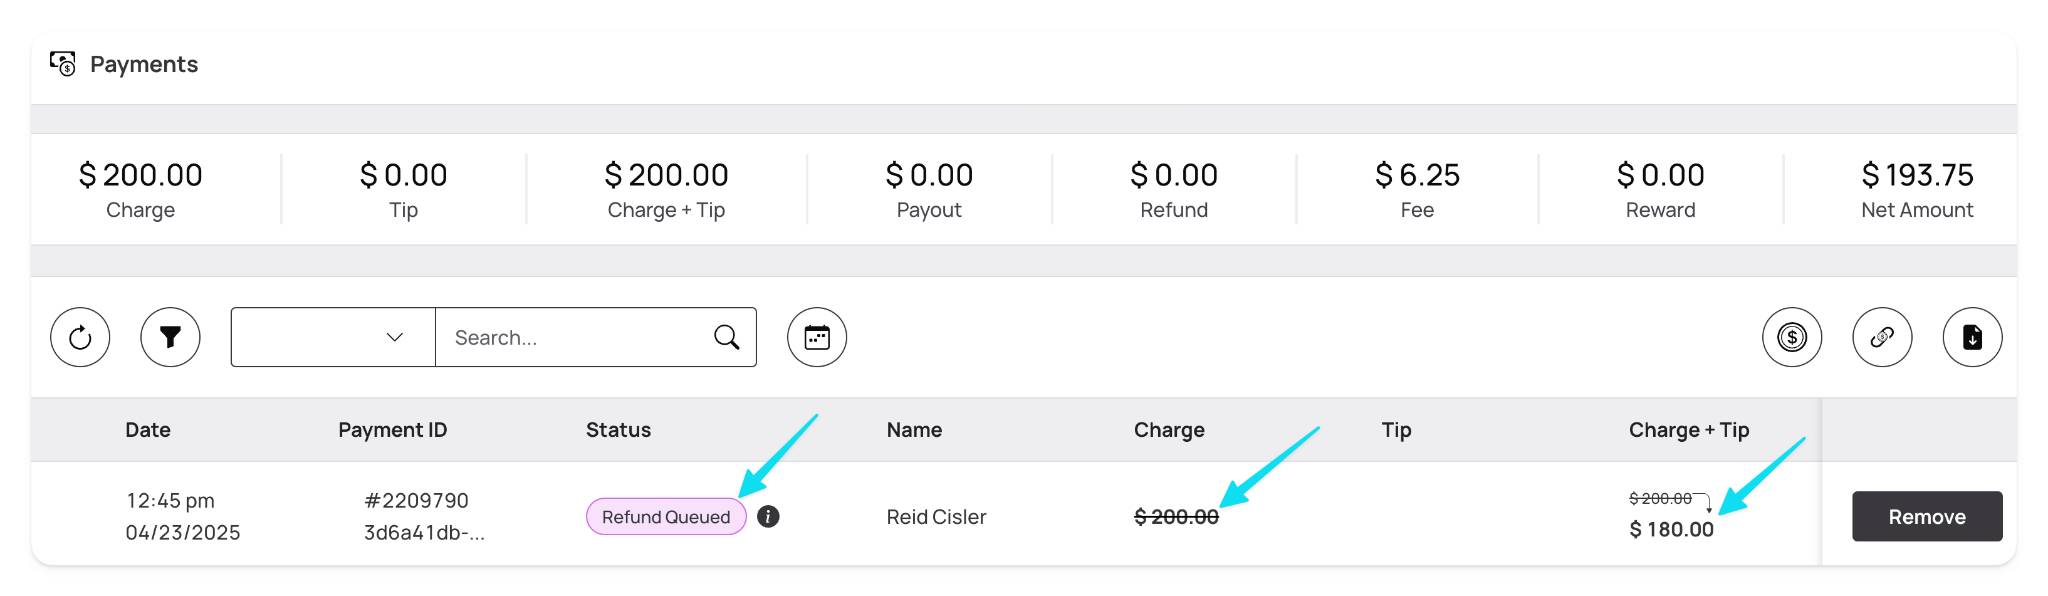
Once the refund button is clicked, the transaction status in the table will change to "refund queued."
You can also see that the original charge and charge + tip now have a strikethrough, showing the new total (shown below).
For more information on payment status, please view the article on Payment Status.
Reinitiating a voided transaction
From the Merchant Portal, you can manage transactions to reinitiate a voided transaction via the Payments tab.
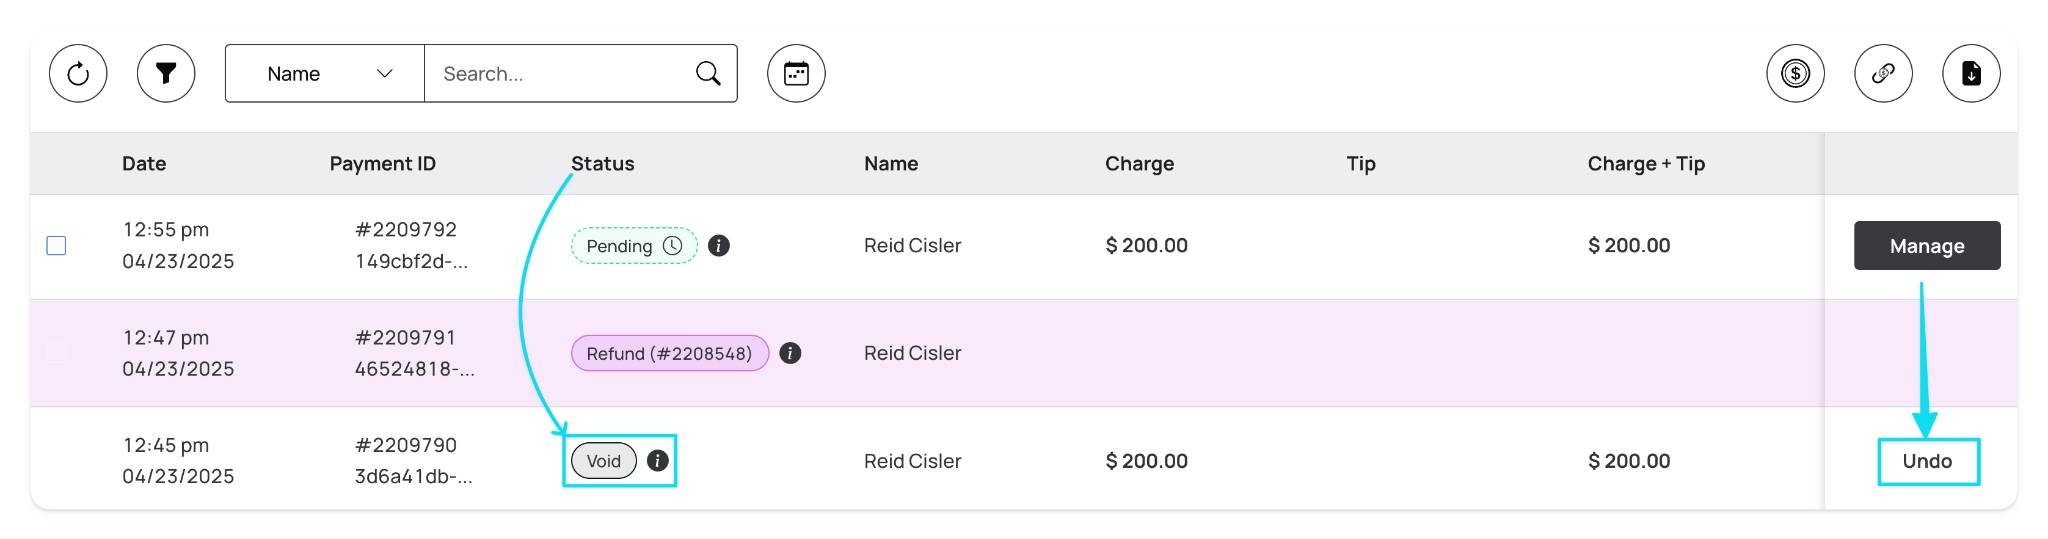
There are two ways to locate a voided transaction:
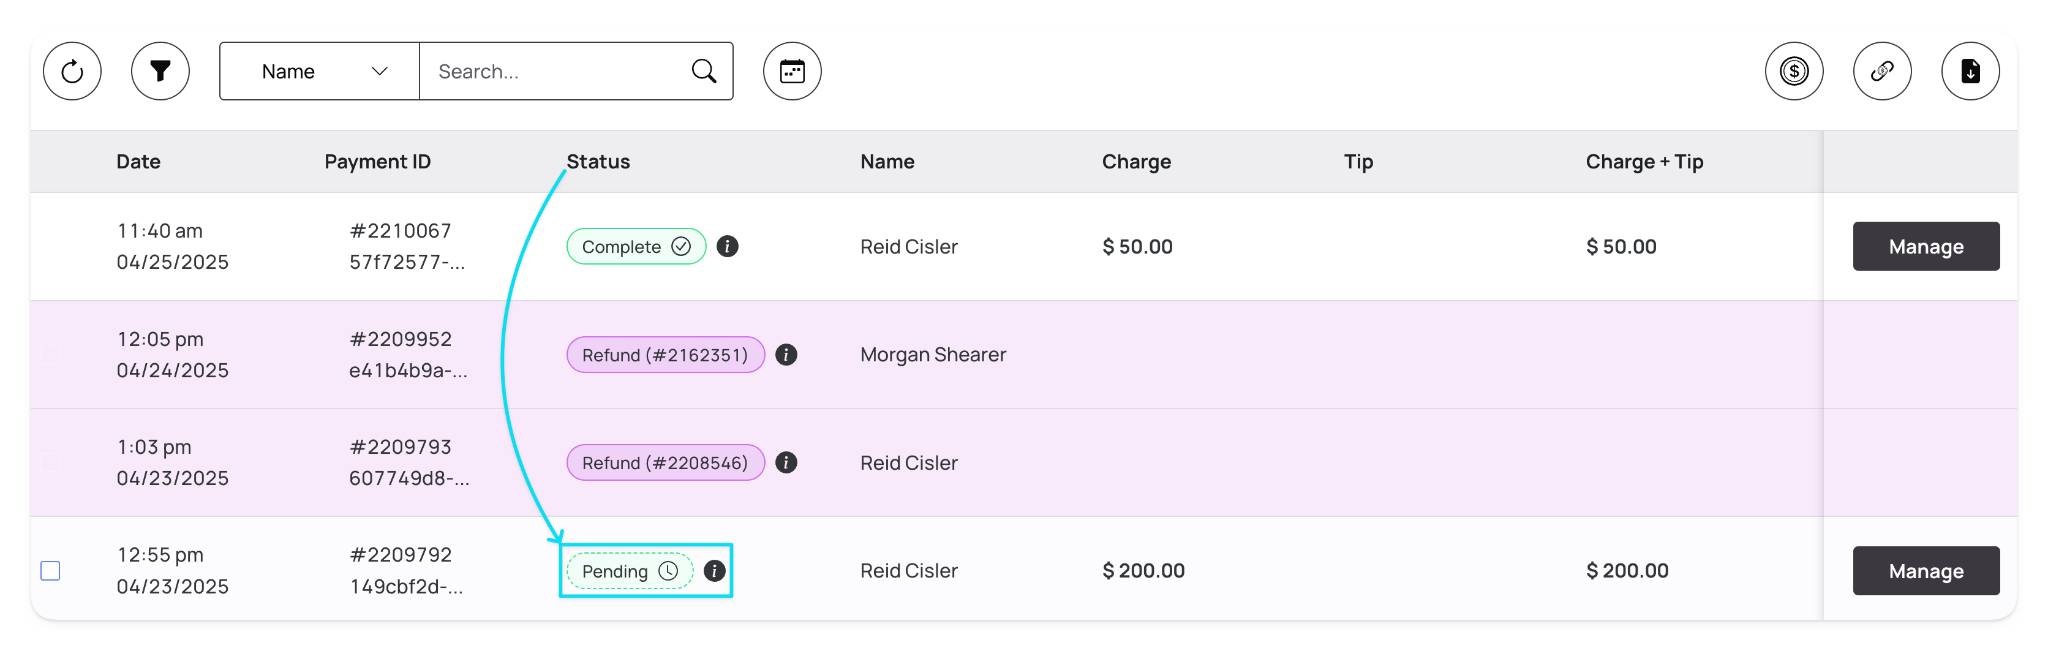
First, you can look for two indicators inside the table on the individual transaction level. In the "Status" column, you would see "Void" and on the far right side, you would see "Undo" instead of "Manage". (shown below)
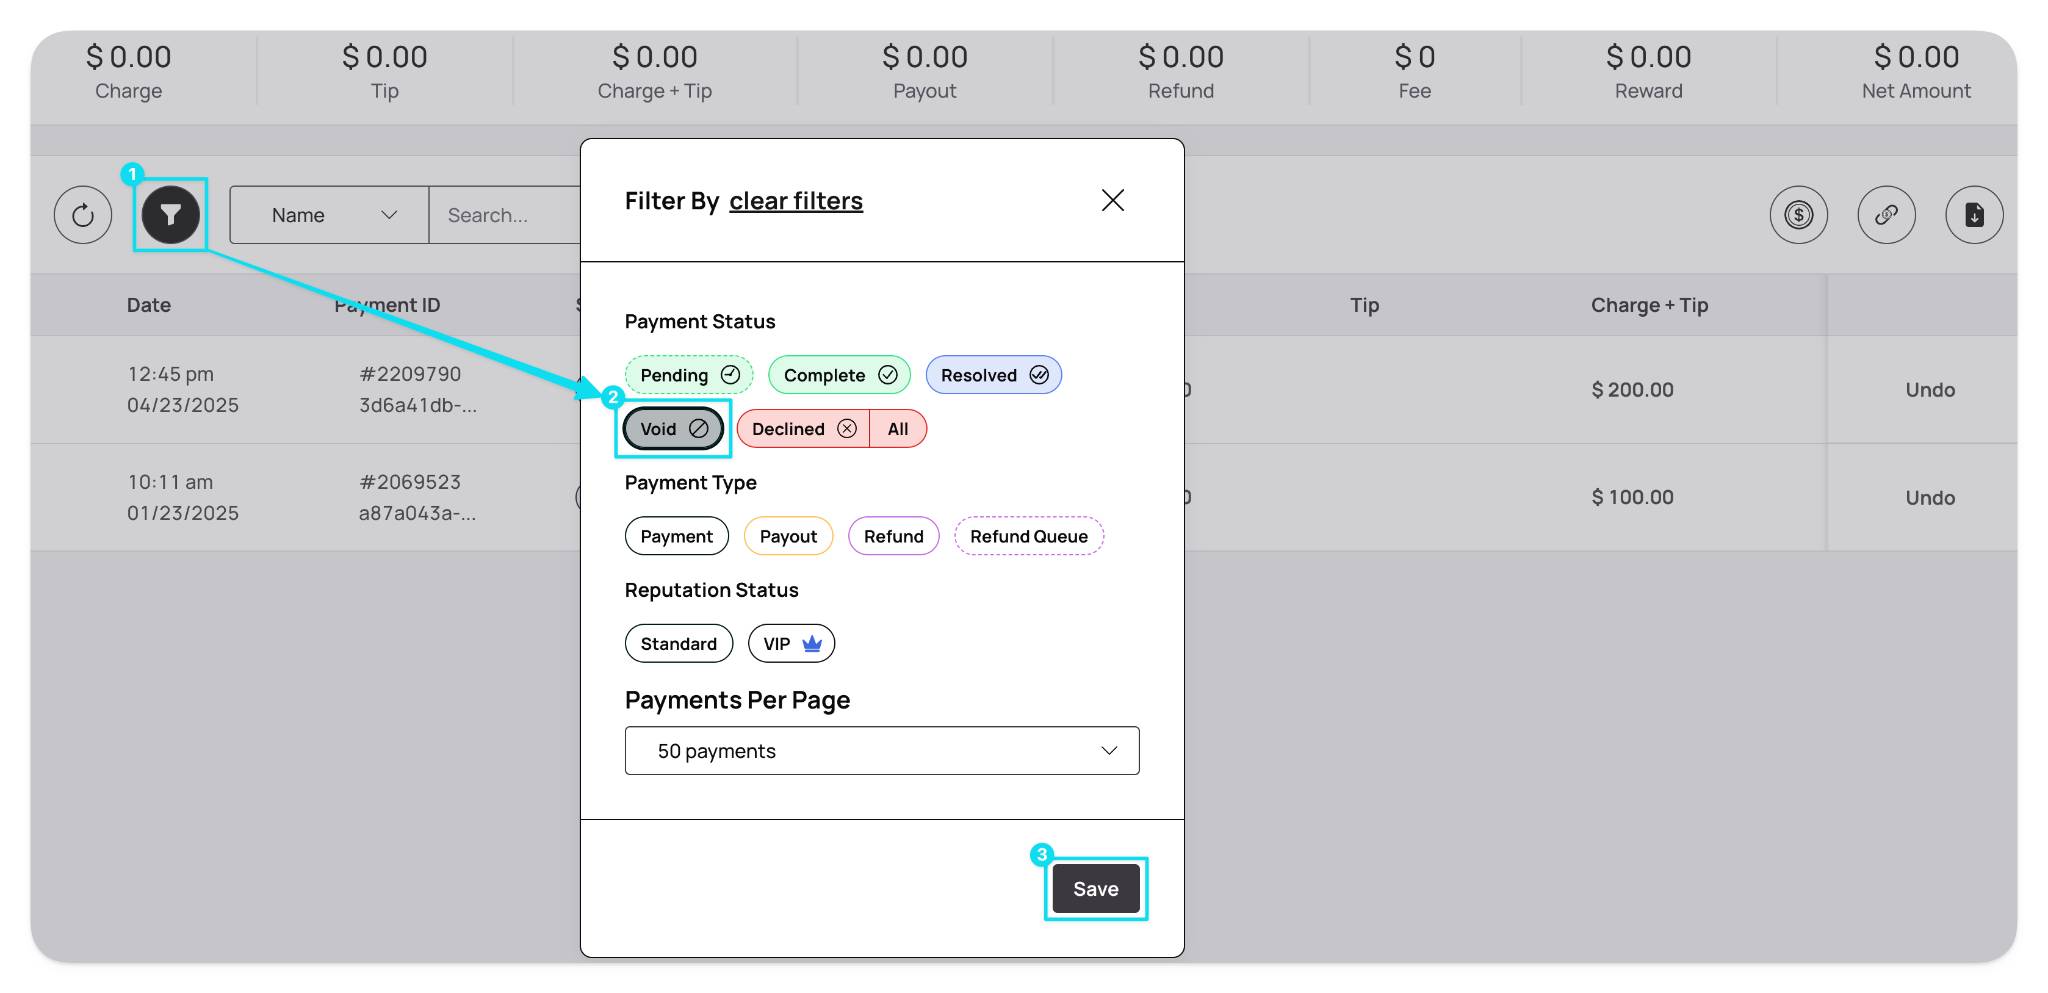
Second, there is an option to utilize the "filter" transactions button to see only voided transactions. (shown below)
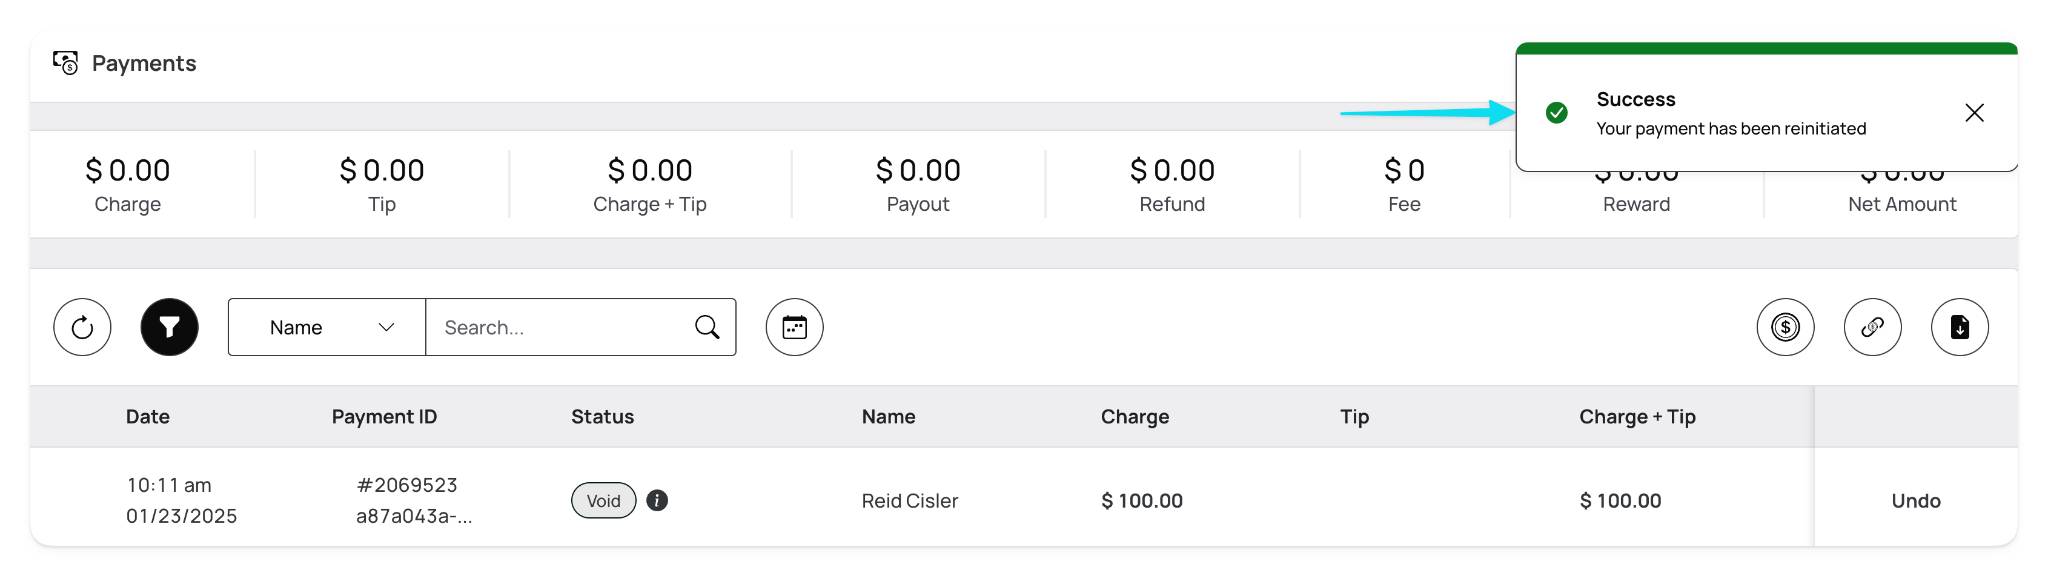
Next, click the "Undo" button on the far right side of the transaction to initiate the pop-up window to confirm reinitiating the voided transaction. (shown below)

Carefully read the pop-up window. After clicking "Continue" to confirm the reinitiation, a successful confirmation message will appear at the top right of the screen. (shown below)
Once successfully reinstated, the transaction will move to a "Pending" status (shown below). The reinstated transaction will batch for processing alongside other transactions created around the same time.
For more information on payment status, please view the article on Payment Status.
Tip configuration
From the Merchant Portal, you can configure tips for your business so that customers have the option to tip when using Aeropay. Tips can be configured per location and by percentage or dollars.
To configure tips, click the 'coin' button at the far right of the page. A pop-up will appear when the 'coin' button is clicked to configure tips. (shown below)
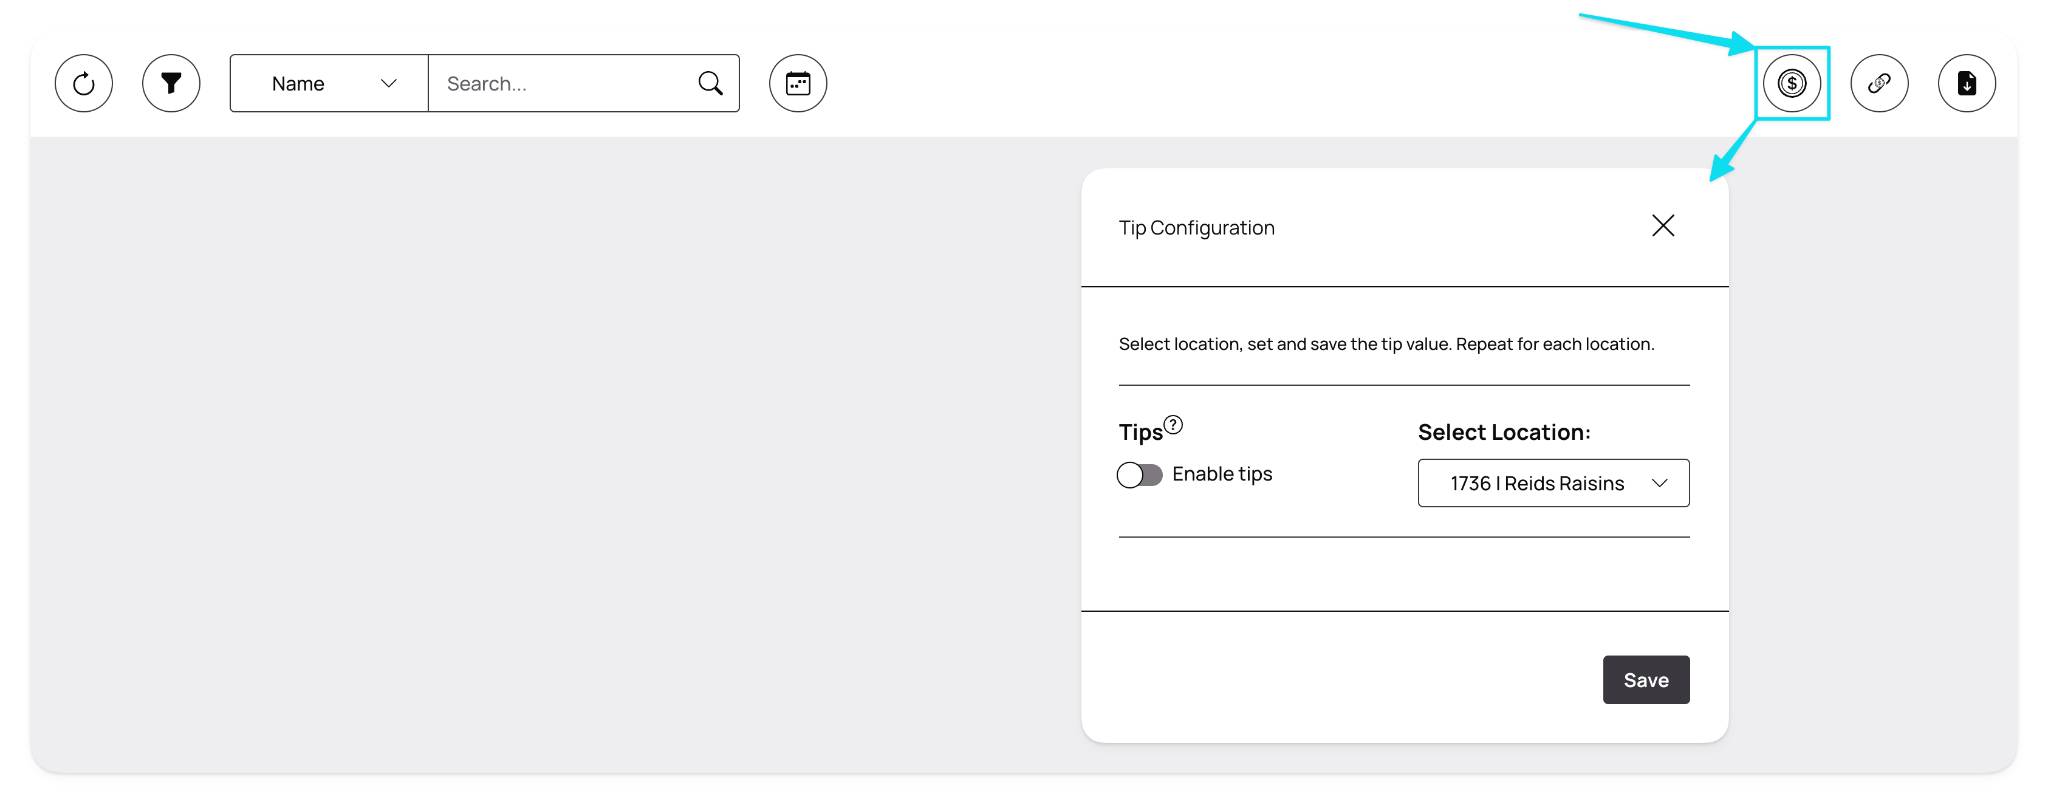
To configure tips utilizing the pop-up window, follow the steps below!
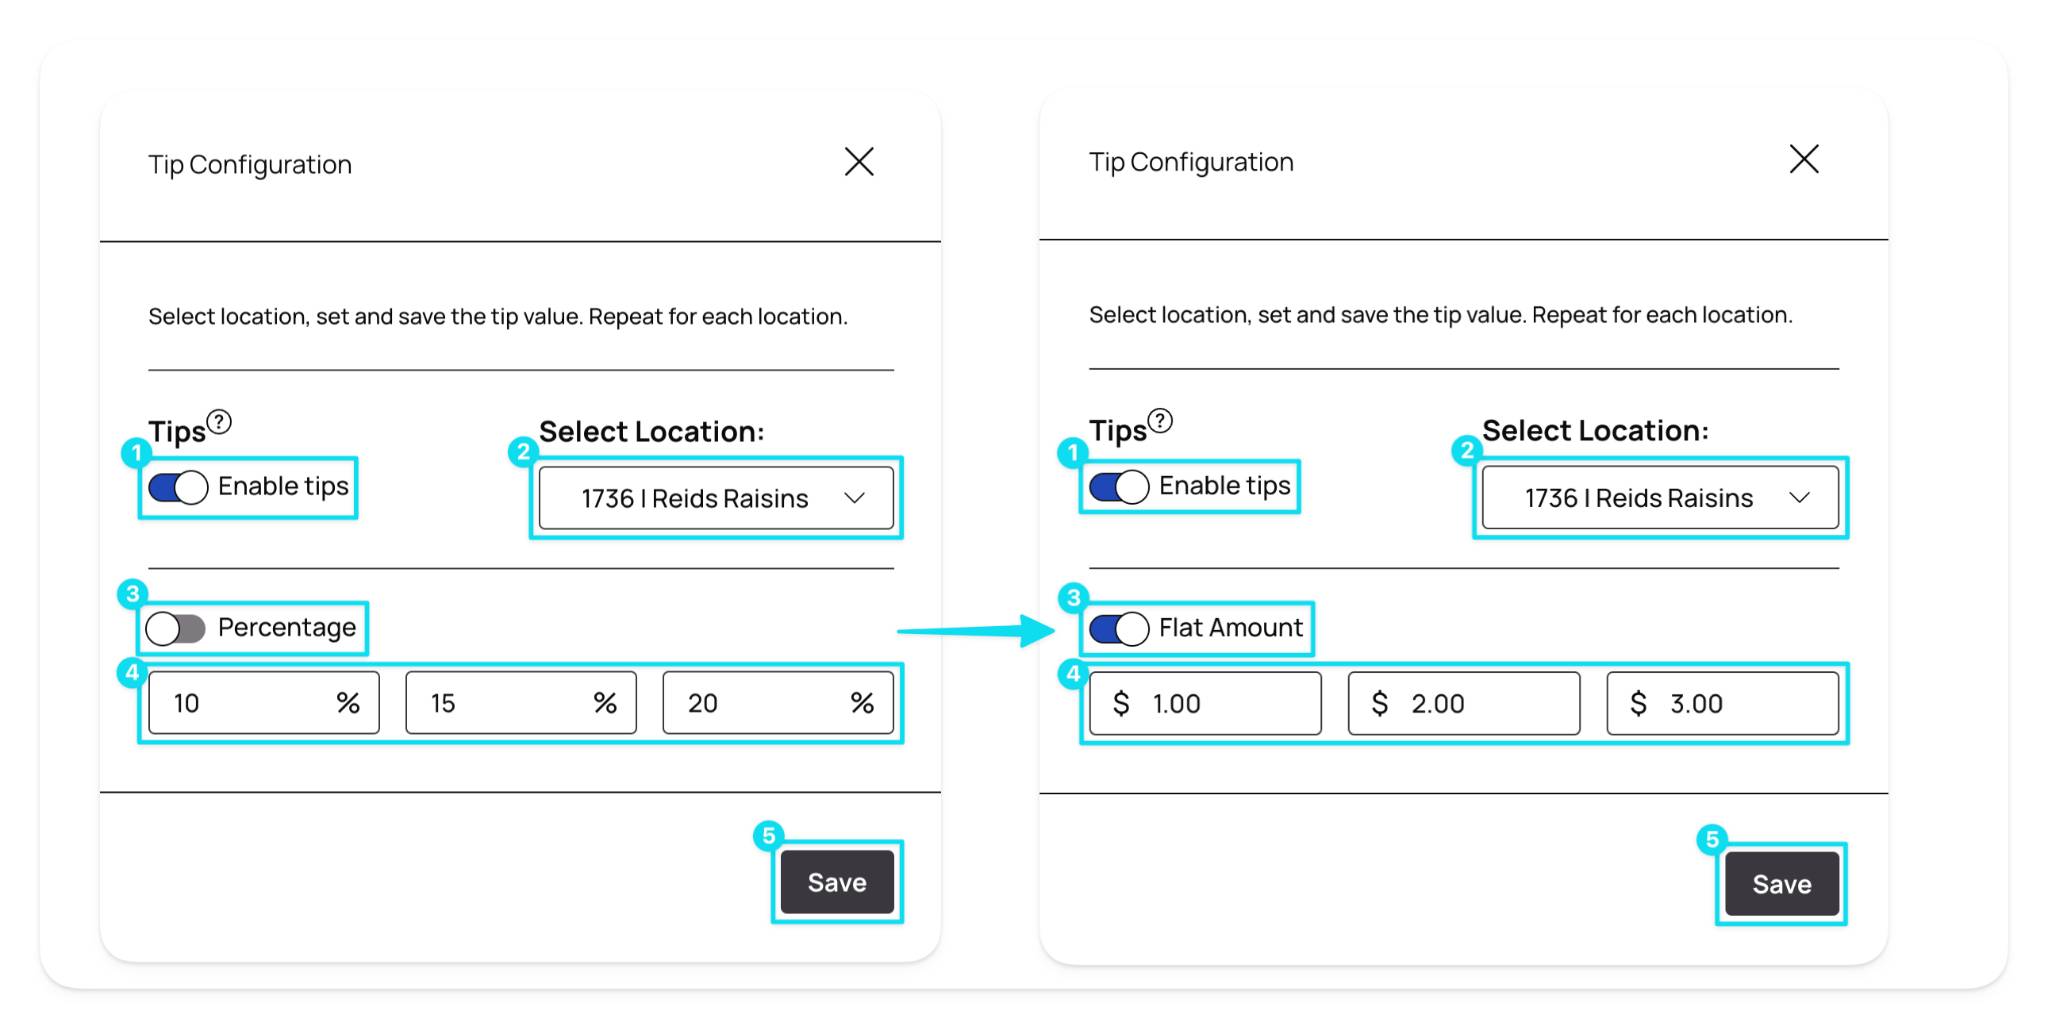
- Enable Tips → when clicked, the bottom section will reveal, allowing tip customization
- Select Location → use this drop-down to select the location for the tip
- % and $ Toggle → use this toggle to switch between percentage or flat amounts
- Input Boxes → utilize these three boxes to input your desired % or $ amount
- Save → click the 'save' button to complete the tip configuration
When a tip configuration is active, follow the steps outlined above to change any portion of the configuration.
Exporting a transaction & batch report
From the Merchant Portal, you can create and export transaction & batch reports via the payments tab.
For more detailed information on creating, understanding, and using reports, please refer to the article on Reports.